
Frequently Asked Questions
Everything you need to know about Your Radar
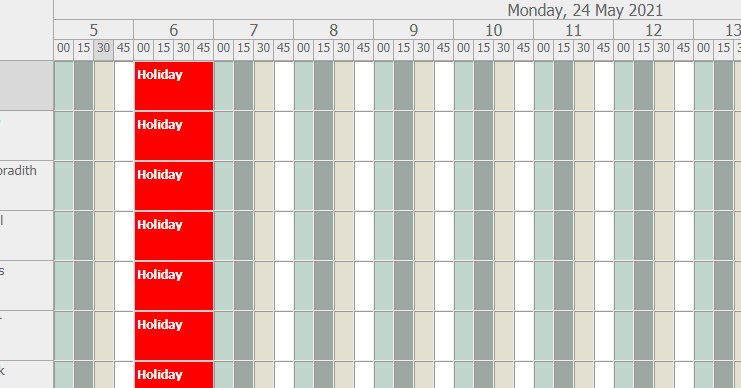
The Stat Holidays are maintained under Settings > Calendar.
With this, both the scheduler as well as dispatch will show Holiday.
When creating or editing the job, you need to change the number of installers needed to 2 (or more depending on the job’s requirements) instead of one. This field is found at the very end of the job entry form. The job can then be dispatched (by dragging) to the specified number of technicians.
In this case, you will need to use the technician interface. Once you have logged in, return to timesheets app, find the job that you want to add another timesheet for, click on view details, and click on the blue add new button! The “all” is for all open jobs only and once a job has been completed, it is no longer considered “open” in the system. <b></b>
To close a job, you will need to locate the job in the schedule to determine which employee it was dispatched to. Once you have found the employee to whom the job has been dispatched, you should first inquire as to whether or not the job was completed. If the technician responsible confirms that the job was completed, they may close the job using the timesheets application in their YourRadar portal.
The technician will then open the timesheets application, enter the job end time, click on parts, and then summary, and then fill out the necessary invoice information. Once the invoice is filled out, click on the confirm button at the bottom. This will complete the job. You will then have to change the job status to job complete for it to show up as complete in the scheduler, by selecting “job complete” from the drop down menu found below the notes box in the timesheet and clicking the blue “update button”.
To update your pricelist, find the job option in the top navigation bar and a hover over “job pricelist/item” to display the pricelist options. Next, click on update pricelist to display the price list. Here, you may either use the specific item or bulk update to update the pricelist. If you would like to only update the price of the specific job for which you are creating a quote, type in the name of the job in the specific item update box, click on the blue select items button, and click the green next button. Here, you can update the price by typing the new value and clicking on the blue “adjust amount button”. When you are satisfied with your new price(s), click on the green “submit adjustments” button to save the new pricelists.<b></b>
To add a new inventory item, select the inventory list from the drop-down inventory menu in the navigation bar. This will display a list of all inventory items currently entered in your system. Locate and click on the grey “add inventory/warehouse file” button. This will prompt you for information associated with the new inventory item. When you are satisfied with your item information, input the warehouse, cost, and quantity information associated with the new inventory. When you are satisfied with the entry, click on the blue “add” button to save your new item.
Please ensure that the URL you are attempting to log in to is correct. Your URL can be found in your training manual and will be in the following format: https://XYZ.yourradar.net (administrative portal) and https://XYZ.yourradar.net/cismobile (technician portal).
If you are using the correct URL, please alert the system administrator and request that they reset your password. Once your password has been reset, you may log in using a temporary password provided to you by the system administrator and create a new password using the personal application.
Please log in to the administrative portal of YourRadar and open the drop-down settings menu. Please select the user configurations settings, and click on “user list”. This will display a list of all users entered in YourRadar. To add a new employee, click on the add user/account representative/rate.
The first section will ask you to enter the new employee’s username, password, and an email address associated with their account. If you would like to be able to dispatch jobs to this employee, please set their status to “Active”. The next section will prompt you for their personal information, including their full name, supervisor, colour code for dispatch, and a custom email signature to include at the end of invoices and customer email communication from within YourRadar.
The final section requires the employee’s bill out rate. This is the hourly rate that will used to generate the customer’s invoice after a service call. When you are satisfied with all of this information, click on the blue “add” button.
If you know your password, please log in to YourRadar and open the personal application. Here, you may enter your current password, and enter your desired password twice. Please click on the blue “change” button to update your password.
If you do not know your password, please contact your system administrator. They are able to reset your password from within the administrator portal. Once your password has been reset, your administrator will give you the temporary password. Please log in to YourRadar and change your password using the personal application.
If you are the system administrator and are no longer able to log in, please contact KDI support.
To add a new customer to your customer database, use the drop down contacts menu in the navigation bar and select “add new contact”. Here, you can fill in all of the relevant information about the new customer. If you would like to add a specific contract with whom you generally correspond at this new client, click on the checkbox next to “add new contact”. This will display a second form where you may fill in the requested information about the direct contact at the client site. When you are satisfied with the account contact and client forms, click on the blue “add” button to save the new client.
If your customers are not receiving their invoices by email, it is likely that this function has simply been disabled in your settings. To enable this setting, locate the settings drop down menu in the navigation bar, and open the general settings. Select invoice settings from the general settings pop out menu, and click on “invoice settings”. This will display your company’s custom invoice settings. To update these, click on the pen and paper icon found to the left of your company’s name. Now, click on the “yes” option in the “invoice email client” field. Once you have changed this setting to “yes”, clients will receive a link to their invoices as a PDF at the email specified by the technician during the invoicing process.
In this case, there are two options. First, you may simply have overwritten your quote price automatically generated using the job pricelist with a price of $0. In this case, simply change the number that appears in the further information quote box that is displayed to the desired quote amount when editing the quote and the click the blue save button.
Alternatively, you may not have input your job pricelist data yet. Without pricelist data, your system sets the quote price for every single job at $0, and therefore, no matter how many jobs you add to your quote, the price will remain at zero after it is saved. To update your pricelist, find the job option in the top navigation bar and a hover over “job pricelist/item” to display the pricelist options. Next, click on update pricelist to display the price list. Here, you may either use the specific item or bulk update to update the pricelist. If you would like to only update the price of the specific job for which you are creating a quote, type in the name of the job in the specific item update box, click on the blue select items button, and click the green next button. Here, you can update the price by typing the new value and clicking on the blue “adjust amount button”. When you are satisfied with your new price(s), click on the green “submit adjustments” button to save the new pricelists.
If instead you would like to update multiple pricelists, use the bulk update box and select an item category from the drop down list and click the black “select items by category”, the “select all” button and the green “next” button. Here, you can easily type in new prices for each job listed. When you are satisfied, click on the blue adjust amount, and the green submit adjustments button to save your updated pricelist.
You should now be able to see the quote amount when re-opening quotes in the quote page.
If you would like to add a new expense type, find the order configuration settings under the settings drop down menu in the navigation bar. From here, find and click on the “sales tax” option from the pop-up out menu. This will display a list of all of the sales taxes that have been previously entered into the system. To add a new tax rate, click on the “add” button and enter the short form code and its full name. When you are satisfied with this entry, click on the blue “edit” button.
If you would like to add a new expense type, find the general settings under the settings drop down menu in the navigation bar. From here, find and click on the “expense type” option from the pop-up out menu. This will display a list of all of the expense types that have ever been entered in your system. To add multiple new expense types, click on the “grid add” button, or to add new expense types individually, click on the “add” button. If you choose to add multiple expense types at once, click on the “add blank row” button to add more entries and click on the insert button when you are satisfied with your entries. If you choose only to add one entry, fill in the required information, and click on the blue add button. In both cases, if you would like your technicians to be able to use the expense type, set its status as active. To hide an expense type from technicians, set its status to inactive.
If you would like to change your invoices, find the general settings under the settings drop down menu in the navigation bar. From here, select the “invoice” option from the pop-up out menu, and click on the “invoice settings” option that is displayed. This will give you a few options; if you would like to customize the header that appears at the top left side of your invoice, you may do so in the first text box. Ensure that you alter the text without removing the <p> and </p> that have been put into your system at the beginning and end of each line of text. If you would like to add an invoice footer, you may enter on in the next text box. Once again, please ensure that any lines of text and presided and followed by <p> and </p>, respectively.
To change the logo that is displayed at the top right corner of your invoice, simply delete the logo that is currently displayed using the grey “delete” button to the right of the image, and use the “choose…” button to upload a new .png image from your files. If you would like to change which fields are displayed in the invoice, you may do so by selecting and de-selecting the different options displayed in the invoice settings box. Any box that is not selected will be hidden from the invoice.
To find your employees timecard data, return to the schedule calendar by using the “schedule” button in the top navigation bar. Here, locate the timesheet button in the function box and click on it. This will display the current day’s timecard entries for all employees who have clocked in for the day. If you would like to select a particular date range use the “from” and “to” fields in the date range boxes. This will display all employees’ timesheets for the period specified.
The worksheet details sheet is the timesheet that is automatically created when you start a new job. That timesheet will be directly associated with a job dispatch that has been received in the jobs application.
The new timesheet allows you to record time that you spent with a customer without a job dispatch. For example, if you were at a client site doing a job for them and they asked you to work on something else because you were already there, you would create a new timesheet for the 2nd job that the client has asked the technician directly to do. This allows you to skip some steps and create a timesheet without a dispatch, rather than the customer taking the normal process of calling in, getting a quote, and having a technician dispatched to them.

